Tuesday, January 24, 2012

Warm and Cheesy

Eggplant Parmesan
Intriguing title...I know.  So...I was craving something warm, cheesy and filling.  Et voila.  Eggplant parm.  Something I had been meaning to try.  Without further ado:

Ingredients
2 aubergines (eggplants)
1 can of crushed tomatoes or tomato sauce
1-2 eggs
1/4 cup flour
Mozzarella cheese
Parmesan 
Spices (salt, pepper, herbes de provence, basil, garlic)


1.  So, I decided to spruce up the canned tomatoes by heating them and letting them simmer with some spices.  Feel free to add in some peppers and onions too!


2.  Big bad eggplant...sliced.  Not perfectly, but "coupé en rondelles" i.e. cut in circles.  I suppose you can be more precise if you intend to cook for others or really want to make it look pretty.  *shrug*  Although, this is quite ideal for lunch leftovers if you need to bring something to work on a chilly day.  

3. Beat your egg(s) in a bowl.  Place your flour and any spices you so choose in a bowl next to your beaten egg. So, what you are going to do is fry these little eggplant rondelles.  What you do is dip them in your beaten egg bowl.  Get them all nice and eggy.  Then dredge them in the flour mixture you concocted.  (*I used a mixture of oat flour, almond meal and adobo seasoning.  I should admit that I have been experimenting with flours and things.  Regular flour would work fine.  The oat flour and almond meal are more of a taste thing.  :  )  Feel free to experiment yourself too.*)  Next, you heat up some oil in a skillet and fry the eggplant, then place on a paper towel to drain the excess oil.  You will do this in batches so as not to crowd the eggplant.  
I suppose I should mention that I probably did not add enough oil.  But, they still turned out okay.  There were also some pieces I did not fry either.  I did a blend when putting the dish together which worked out well.  But, I do think that frying every piece adds a nice flavor and a bit of an extra kick.  


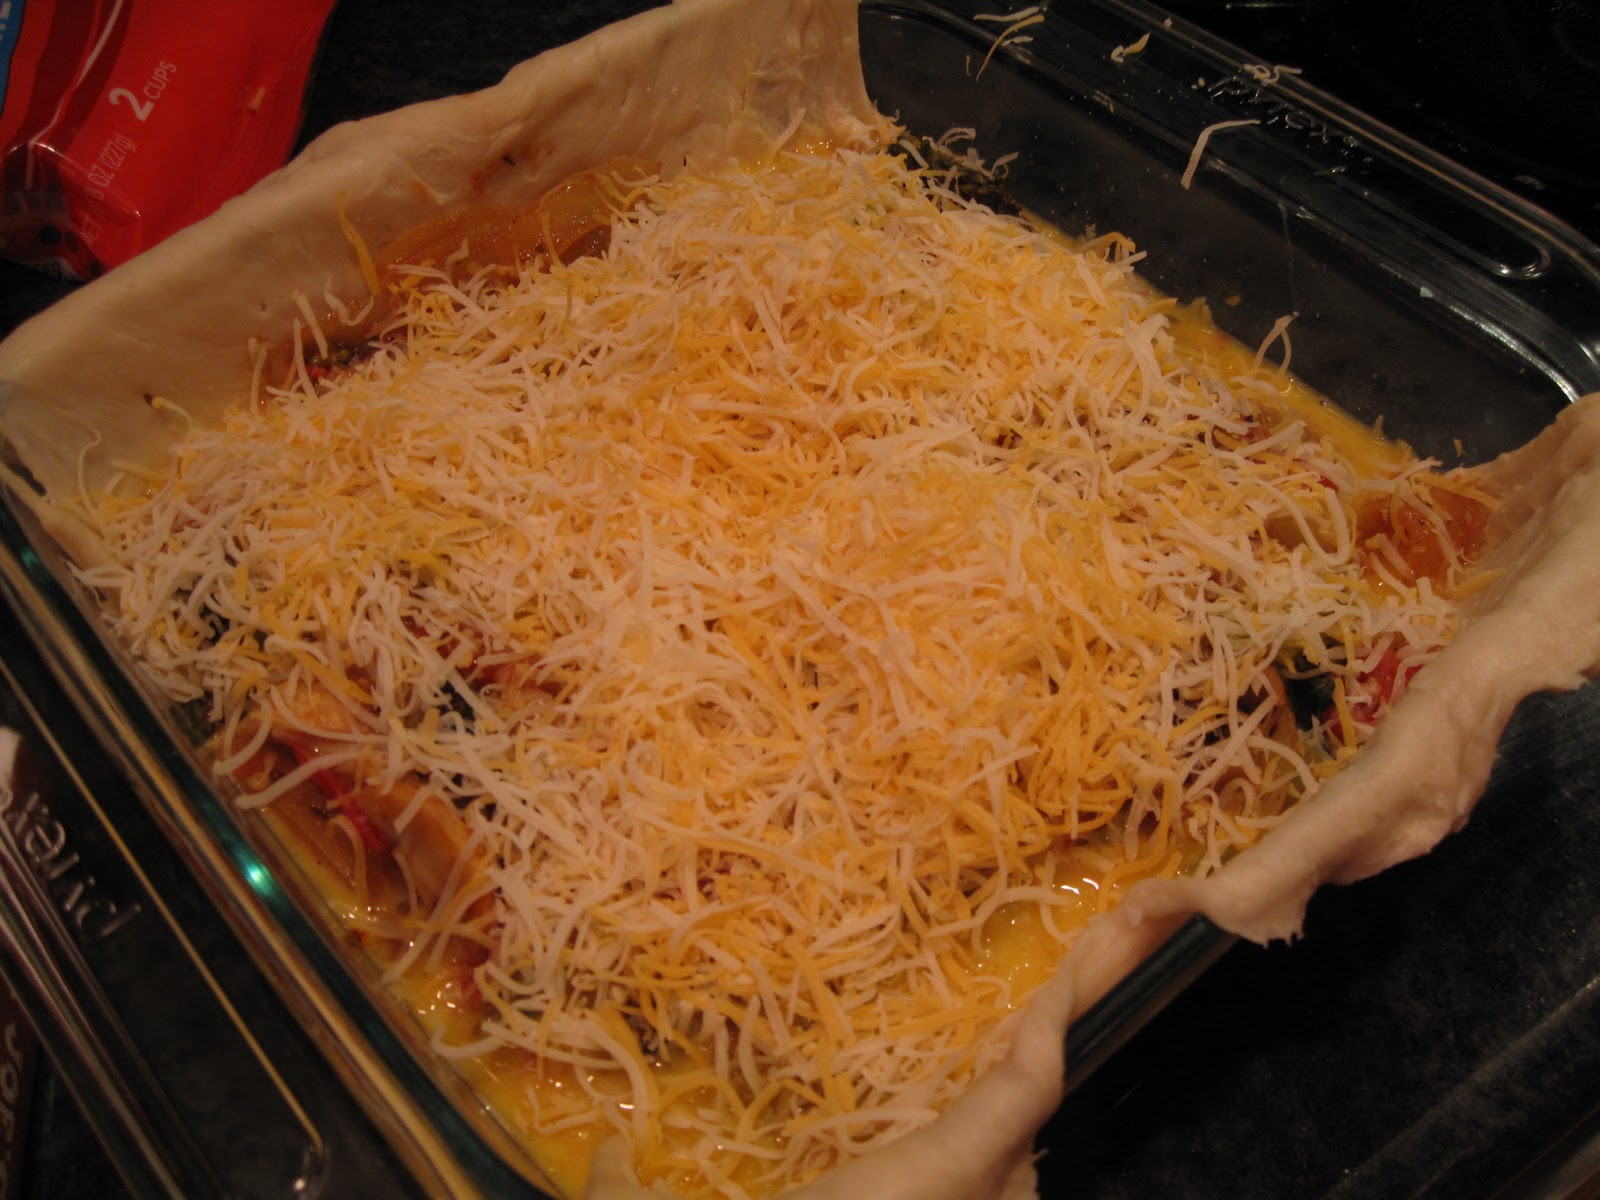
4.  So, take a baking dish (I used two pie plates for this).  Coat the bottom with your tomato sauce mixture.  Then top with the fried eggplant.

5.  Next, add in mozzarella chunks or slices.  It is probably easier to slice it thinner than I did.  Trial and error.  But, it was definitely cheesy in a good way.  Top with the sauce, then more eggplant and more mozzarella.  You now should have two layers.  

6.  Top with some Parmesan!  I may or may not have gone overboard with the cheese.  Mighty tasty though.  

7.  Bake in the oven at 350-375 degrees for 40 min. to an hour depending on your oven.  It is done when the cheese is melted and the Parmesan is slightly crispy.  


Bon appétit!

Monday, January 16, 2012

Spicy Green Mussels
adapted from the NY TIMES (http://www.nytimes.com/2011/10/12/dining/spicy-green-mussels-recipe.html)

So, this was made, as per my mom's request.  *note:  credit should be given to the hammering and dessicating of the coconut to the lovely kitchen aids, Peg Kuman and Gayle Sorrentino.  :  )

I would like to say that this is a stellar recipe for anyone who enjoys fresh mussels, spice and just trying new things.  It is also important to note that it might look a tad intimidating, but essentially it just requires some prep work for the food processor.

Without further ado:

Ingredients
2 bunches cilantro, leaves and tender stems, coarsely chopped, about 2 cups
1 2-inch piece fresh ginger, peeled and thickly sliced
2 garlic cloves
1 or 2 serrano chiles, split lengthwise (I would recommend just one, two if you or your fellow diners like to feel a lot of burn.)
1/2 cup grated unsweetened fresh coconut fresh
1/2 teaspoon salt
2 teaspoons brown sugar
4 pounds mussels
2 tablespoons unsalted butter
1 cup vegetable broth or water
3 or 4 scallions, thinly sliced
Lime wedges to serve

1.  Here is your fresh coconut.  Essentially, it has two eyes and a nose.  Now...what to do with this strange fruit.


2.  BREAK IT!!!  Heh, how many times can you honestly say that you were able to use a hammer as a kitchen utensil!?  If you are feeling frustrated, this could be a good go-to recipe.  So, with regards to actually getting into the coconut, there are plenty of youtube videos, etc. on how to actually do it.  I would recommend watching one.  But, for a quick summary, poke the eyes and nose of the coconut.  Puncture the softest one to drain coconut milk (which you can drink).  It should be sweet.  If not, you should get yourself a new coconut.  Then, heat the coconut in the oven for about 20-25 minutes.  After it cools...break that baby!  "If I had a hammer..."  You can then scrape the flesh and get the chunks you want.  No need to shred it as it will be placed in the food processor anyway.


3.  You are going to make a green chili curry paste of sorts.  This is where you place the garlic, cilantro, chilis, salt, ginger, coconut and brown sugar into a food processor.  Ground to a coarse paste.  Et voila!


4.  Clean and rinse your mussels thoroughly.  Remember to discard any open or broken ones.


5.  Heat the butter in a large dutch oven.


To quote Julia Child "Butter makes everything better."

6.  Add the mussels to the pot and coat with the butter.  Then add the broth or water, raise the heat and keep covered for another two minutes.  Add 1/2 a cup or a quantity of your choosing to the pot and cook 4-5 more minutes, keeping the lid on.  


7.  Chop up the scallions and add them to the pot.


8.  The mussels will not take very long to cook/steam.  They are done when they open.


Serve and enjoy!
It is "chili" outisde...

Quand il fait froid (when it's cold outside), we tend to crave things to keep us warm.  There's that whole "stick to your ribs" fare or mom's home cooking.  We get nostalgic or think of thick soups or just having some hot cocoa by a fireplace.  Anything to keep your mind off the cold.  Chili is a most lovely dish.  The one presented here happpens to be vegetarian.  Go figure.  :  )  You can have some most filling and satisfying meatless chili and still come away warm and full.

Enjoy!

Des ingredients
1-2 oignons (onions), chopped
2-3 sweet potatoes of medium-large size, peeled and chopped
2 cans black beans, rinsed and drained
1 large can of crushed tomatoes (you can chop up some fresh tomatoes too if you like)
Des epices (garlic, chili powder, salt, pepper, cumin)  You can add some cocoa powder if you feel a tad adventerous

1.  Heat oil in a large dutch oven.  Add the spices until they become fragrant.  Saute the onions for 2 minutes, then add in the sweet potatoes.

2.  Cover and let the onions become more caramelized.  Add in some water to cover the mixture.  Bring to a boil.  Add as much water as you like.  It depends on how liquidy or thick you prefer your chili.  The one here was more thick and hearty i.e. moins d'eau (less water).
3.  Stir in the black beans.  Mix them in and stir for 2-3 minutes.
4.  Add in the crushed tomatoes and stir to make sure it is well covered.

5.  Cover and let simmer.  You want the sweet potatoes to be soft and tender.  At least an hour.
6.  Serve and enjoy.  
Note:  After sitting in the fridge, the spices  absorb into the chili making it that much tastier when you reheat it the next day.  Everyone loves leftovers.  ;  P

Thursday, October 27, 2011

Ode to a Sweet Tooth

Fudgy Chocolate Brownies...thank you Martha Stewart.  My Dad's favorite brownie recipe (slightly tweaked) for his birthday.  Alors...

Fudgy Chocolate Birthday Brownies
adapted from http://www.marthastewart.com/314726/fudgy-chocolate-brownies


Ingredients
8 oz. chocolat (used Baker's bittersweet)
3 eggs (Martha uses 4)
3/4 of a stick of butter...but, feel free to use the whole stick
1 1/2 cup de sucre (sugar)
3/4 cup de la farine (flour)
1 tsp. de la vanille (vanilla)
1/2 tsp sel (salt)

I also added in some cinnamon and some coffee to bring out the chocolatey goodness, as well as a cup of chocolate chips because well...CHOCOLATE!

1.  Assemble ingredients.  Notice the oh so glamorous Ziploc.


2.  In a saucepan, heat some water to boiling (you are created a sort of double-boiler here to melt the chocolate).


3.  Melt and temper the chocolate.  Adding some of the little blocks with the butter.  Stir until smooth.  After butter and chocolate are melted and thoroughly mixed, set aside and let the mixture cool for 10-15 minutes.


3.  After the mixture has cooled, add in the sugar.  Mix it in.


4.  Then add each egg.  One by one as well as the vanilla.


5.  Add in the coffee, if you feel like adding some.


6.  Toss in the flower with the salt.  Mix until fully incorporated.


7.  My Dad did not want anything super snazzy in his brownies, just the simple chocolatey-ness and some added chocolate chips were all that he requested.


8.  After you have mixed everything all together, pour the batter into a prepared baking dish.  Make sure to butter the sides.


9.  Spread the batter so that it is even, unless you want to make some lopsided brownies.  No judgement here.  To each their own.  Varying thickness can always make for an interest experiment.


10.  Au four a 350 degrees (Bake/in the oven at 350 degrees) for 40-45 minutes.  You can lessen the time if you like your brownies slightly more gooey in the middle.  More molten chocolate lava cakey.


11.  Mr. Birthday Man (mon pere/Dad) got the honor of cutting and tasting first brownie.  


11.  Nothing like some chocolat pour un anniversaire and to welcome the autumnal snow that we will apparently be having.  Happy almost Halloween!

Saturday, October 22, 2011

How to Feed and Nourish a Nerd

So, I should preface this brief post by saying that there are a TON of people at New York City Comic Con (Comic Book etc. convention...a dweebs unite, and I am pleased to say that I was an attendee).  So, when navigating through droves of art, fantastical cosplayers, game play and just random stuff, it is quite necessary to make sure one has the proper nourishment throughout the course of this 3 day event.  *Note:  NY pretzels, soda and other fast food items only suffice for so long, particularly while spending copious amounts of time waiting in line to see speakers such as Mark Hamill and Seth Green (to name a few).  

So, prior to embarking on this little weekend, I thought it necessary to feed my meat-eating friends, yet share a meal together and make sure it was hearty enough to satiate some weary travelers who trekked downstate.

Here you have it:

Nerdy Vegetable Quiche
1 Trader Joe's pate feuilleté (Yeah, not the biggest fan of making my own crust salé.  I justified it by telling myself that this sort of crust is the most difficult to make, and many French women tend to by this one store bought as well.)
1 Oignon (onion)
1 boite de champignons (box of mushrooms)
1 head of broccoli
Mix of bell peppers (frozen or fresh)
1/4 of a head of cauliflower
1 1/2 cups epinards (spinach)
Several tomatoes of your choosing (not too many if they are fairly large and get very watery)
1/2 bag of a cheese blend (I used Mexican)
3 eggs
Spices (garlic, salt, pepper, red hot chili flakes, dash of curry powder, herbes de provence)
*Note:  This is a take on an "everything must go quiche," so use whatever you have and be creative!  :  D


1.  Sautee the legumes (veggies).


2.  While you are letting all the vegetables simmer and marinate with all the spices, whisk the three eggs together.  You can add a dash of salt, pepper and red chili flakes.  Also, to make the mixture slightly thicker, you can add 1/4-1/2 cup of milk.


3.  Place your pre-made crust in an oven-proof fan.  I tried to stretch it out...I was clearly too lazy to cherche (look for) a rolling pin.

4.  Pour in your veggie mixture.

5.  I made the mistake of pouring in my egg mixture before my cheese.  I typically like to put the cheese beneath the eggs so it spreads into the quiche a little more evenly, but both work.
 

6.  Cheese sprinkling time!!!

7.  Au four (In the oven) at about 350-375 for 30-40 minutes depending.
 

8.  And there you have it.  "Meaty" enough for those who are scared of their greens, but won't complain when they finally sit down to warm spicy veggie goodness.  A nerdy vegetable quiche!